Simple Guitar Chords And How To Play Them
This lesson is part of the 'Play Guitar In Two Months' series of articles, although it is also written to be a stand-alone lesson too. The aim of the lesson is to show you how to play simple guitar chords. If you read through the directions and work hard you should be able to achieve this quite easily. More information on playing chords is available here: How To Play Guitar Chords.
Why Learn Chords?
Playing chords is an important part of guitar playing, and it is the first thing that many guitarists learn. Chords are basically groups of notes that are played at the same time. On the guitar, chords are strummed to accompany a song or melody. By learning a few simple guitar chords, you can play your favorite songs, and also begin to start writing your own.
Chord Boxes
Chord boxes show where the fingers should be positioned in order to play a certain chord. Before continuing with this lesson, make sure you know how to read chord boxes. You can find out how to do this here.
[ad name="Google Adsense Lge Rec"]
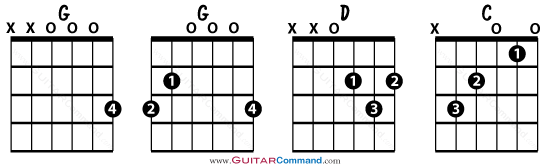
G Major Chord - Simple Top Three Strings Shape
The first guitar chord you are going to learn is a G major chord.
The easiest way of playing a G major chord is by holding down just one note: the G at the third fret of the high E string. This chord is shown in the chord box above. If you then strum the top three stings you will be playing a G chord. Aim for the top three strings and if you hit the fourth string by mistake it doesn't matter. Try to avoid playing the two lowest strings.
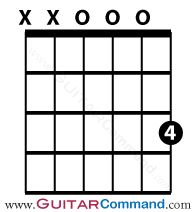
Count out a slow and steady 'one, two, three, four' (or use a metronome). Continue to do this and strum the chord downwards on every beat. Keep going until you are happy with the sound and the feel of playing the chord. Remembering to keep the tempo steady and your strums an even volume.
You can experiment with the loudness of your strums, and how the sound changes depending on where you play the strings. Strumming near the neck produces a mellower sound than if you strum near the bridge, where the guitar produces a brighter, harpsichord-type sound.
G Major Chord - Full Shape

Once you have mastered playing the three note G chord, you can expand it by adding the bass notes. Now, instead of playing just the three highest strings, you can now strum down all six of the strings. This will be your first full guitar chord. You will return to this simple guitar chord throughout your guitar playing career. Don't worry if it doesn't sound quite the way you want it to at first. Playing chords for the first time is tricky but you will soon get used to it. See the troubleshooting guide at the end of this lesson if you are having problems.
C Major Chord
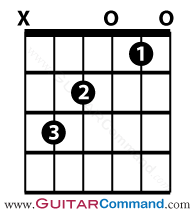
Now try playing the C major chord above. Some guitar chords, like the first version of the G major above, require you omit some of the strings from your strums. Strings you should omit are marked with an X in chord boxes. With the C chord shown here, you should avoid playing the bottom string, although it doesn't matter too much if you do occasionally hit it.
[ad name="Google Adsense Lge Rec"]
Once you have got the hang of playing the C major chord, try alternating between the full G chord and the C chord, playing eight strums of each. Keep the tempo very slow at first. It is better to play slowly with a steady tempo than to play fast with an uneven tempo. One of the rhythm guitarist's duties is to maintain the tempo of a song.
When you can change between chords without slowing, try playing just four strums of each chord. When you are ready, try it with a faster tempo.
D Major Chord

The third in this group of simple guitar chords is the D major. This chord requires you to play only the top four strings. You may find this chord less of a stretch than the G and C chords. Start by repeating four strums of the D chord. Then alternate between the D and either the G or C chords for four beats each.
Simple guitar Chord Sequence
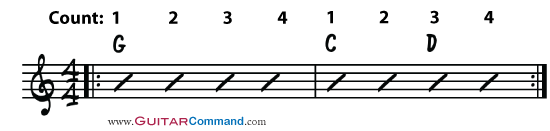
Once you know the simple guitar chords above, and can play them quickly and change between them without slowing down, you can try playing this simple chord sequence. Play four strums of the G chord, followed by two strums of the C chord and then two strums of the D chord. Take it very slowly at first, then build up the tempo as your confidence grows.
If you have come this far, congratulations. Practice hard to get the individual chords sounding good and the changes between chords nice and fast. Above all else don't worry if you are having problems. Everybody does when starting out. The first few weeks of guitar playing are the hardest because your fingers will never have done anything like it before.
Once you have mastered playing simple guitar chords, go back to Learn Guitar In Two Months for your next lesson!
For a comprehensive collection of guitar chords, see our Guitar Chords book for Kindle.
Simple Guitar Chord Troubleshooting
Although your fingers will soon start to toughen up, at first it can be quite uncomfortable pressing down on the strings. By taking things slowly and taking a break rather than fighting through the pain, you will advance at a much faster rate!
If your chords are sounding dead and muffled, don't worry. You just need to make a few small adjustments to make your chords ring out clearly.
The first step is to identify which notes are not sounding properly. Play the chord one string at a time. When you get to a note that isn't sounding correctly, stop and shuffle your fingertip around inside the fret until the individual note sounds good. It is often the position of the finger within the fret, rather than how hard the note is being pressed down, that determines if a note will sound correctly. Play the note again and repeat the process with each string. Sometimes the problem isn't caused by the finger that is holding down the problem note, but by one of the other fingers touching the string and preventing it from ringing. If shuffling your fingertips around doesn't alleviate the problem, check that the string is not being inadvertently muted by a neighboring finger.
Good luck playing these simple guitar chords. Let us know how you a getting on in the comments below.
